
Stop wasting time and energy on arm routines full of fluff and needless repetition. Memorize these rules and start building bigger biceps today!
Thousands of articles have been written about the so-called secrets of building softball-sized biceps. Well, this piece is a bit different, because there's nothing secretive about it. No proprietary blends or fancy gimmicks here! Just a simple collection of rules that will help you build better arms—and your own arm routine—for years to come.
If you're ready to build a pair of monster biceps, check out these 10 arm-training keys, and then try the workout itself on for serious size. Your sleeves may regret it, but you most definitely won't!
1. Start Heavy
As with any body-part routine, you want to start off with a movement that allows you to move the most weight. While that's normally a multijoint exercise—like squats on leg day—there's not a lot to choose from when it comes to biceps. Sure, the biceps are recruited during back exercises, and some arm workouts even include chin-ups, but if you're here to work arms, why not just work arms? Keep it to single-joint movements and do your chins on back day.
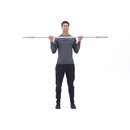
You can use the most weight with the standing barbell curl, so it's your best first exercise. Another thing the barbell curl has going for it is that it effectively targets both the long and short heads of the biceps. If you can handle the Olympic bar here, great. If that makes your wrists scream, feel free to use the EZ-bar instead. Don't end up injured trying to look tough!
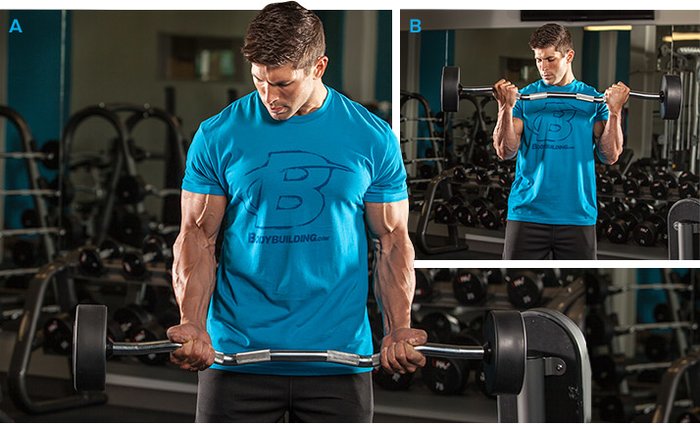
EZ-bar Curl
2. Don't Let Your Elbows Drift
While this article won't focus on exercise execution, there's one form faux pas that's prevalent from beginner lifters all the way up to the pro level: Unless you're intentionally cheating, never pull your elbows forward from their position at the start of a curl movement.
The move where this is most common is the barbell curl. When you curl the weight high enough that your elbows drift from your sides to front of your body, the front delts kick in to help you raise the weight. Pulling your elbows forward also decreases the tension on the biceps at the top, almost making it a resting spot. This won't happen if you keep your elbows locked at your sides.
This rule also holds true for incline curls, dumbbell curls, hammer curls, or any other curl in which your upper arms should be locked in position by the side of your body.
3. Begin Your Workout With Lower Reps
Many lifters almost automatically choose a weight they can do comfortably for 3 sets of 10, and then move to the next exercise. After all, exercise science tells us the hypertrophy range is 8-12 reps, so why would you ever want to vary from that range? Because building strength invariably contributes to greater muscle size.
Don't take this to mean that you should perform one-rep-max (1RM) curls to get bigger arms. Just include a few sets of around 6 heavy reps, which gives you a slightly better strength-building stimulus than using a weight you can do for 8.
How heavy is heavy? If you're cheating from your very first rep, the weight is simply too heavy (and I'll save you the warnings about increased risk of injury, because you've heard it enough). Aim for a weight where you cheat only on your last rep or two, and minimally at that. Break this rule, and you'll once again only end up recruiting muscles other than your biceps!

Aim for a weight where you cheat only on your last rep or two, and minimally at that.
4. Vary Your Hand Placement on Barbell Curls
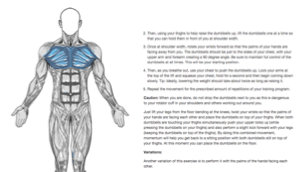
The textbook way to perform barbell curls is with a shoulder-width hand position. There's nothing wrong with this, but to stay ahead of your body's tendency to adapt, it's necessary to change up the muscle-recruitment pattern at times. While the standard grip hits both the long and short heads, moving your hands in or out allows you to selectively focus on one head more than the other.
The wider your grip on the bar, the more you shift the emphasis to the short or inner head and reduce stress on the long or outer head. Likewise, a closer grip puts more of the focus on the long head, which is the head that's visible as the biceps peak. The Monster Arms workout below includes both variations.

While the standard grip hits both the long and short heads, moving your hands in or out allows you to selectively focus on one head more than the other.
5. Raise Your Reps Over the Course of the Workout
After your initial sets of 6 reps, it's time to slip into the classic muscle-building rep range of 8-12 reps with a weight that causes you to hit muscle failure at the end of that range—using good form, of course. From there, things only get higher.
For your second movement, choose a weight you can do for 8 reps; for the third, shoot for 10. As your arms fatigue over the course of your workout, intentionally choose relatively lighter weights that cause failure at a higher rep target, all while staying in the muscle-building rep range. Going progressively lighter allows you to perform more total reps and inflict more muscular damage than totally exhausting yourself after just a couple of exercises.
6. Vary Your Elbow Position and Grip Style
When putting together your routine, you don't want to include several exercises that are too similar. You'll achieve better overall stimulus if you include movements that are substantially different from one another. With biceps, there are two variables:
- Elbow position: Behind, in front of, or next to torso
- Grip style: Underhand, overhand, or neutral
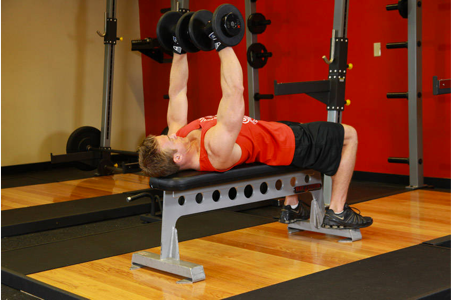
When your elbows are behind the plane of your back, as in an incline bench curl, the long head gets a better stretch. This means it's capable of contracting more strongly, which makes the incline curl a good choice.
Incline bench curls also allow you to vary grips, because they're done with dumbbells rather than barbells. You can keep your hands supinated, or palms-up, throughout the movement; alternatively, you can go with a neutral grip and turn your palms up as you lift the weight. Many find they can get a stronger biceps contraction this way.
7. Include an Elbows-Forward Movement
With your elbows in front of your torso, as in preacher curls, the long head isn't fully stretched, and the short head picks up the bulk of the work. This makes preachers a great follow-up to inclines. Of course, preacher curls have likely been on your biceps menu for some time, so let's change them up a bit to give you a new muscle-building stimulus.
Enter the Scott curl, named after the first Mr. Olympia champion, Larry Scott. (Many lifters know it today as a spider curl.) While most lifters perform preacher curls on the angled side of a bench, Scott favored the steeper side. This more challenging variation doesn't afford a resting spot at the top of the move, and it also minimizes the work done by the front delts.
8. Include a Neutral-Grip Movement
The biceps get plenty of work in all curling variations, but the simple act of switching to a neutral or palms-facing grip brings about an important change: It boosts the involvement of deeper elbow-flexor muscle called the brachialis, which lies beneath the biceps. Building its size will definitely increase your arm girth, particularly if you've primarily been doing palms-up curls until now.
If you've already included your elbows-forward and elbows-back movements, pick a hammer-curl variation with your elbows at your side. Rope hammer curls, seated dumbbell hammer curls, and standing hammer curls all fit the bill here.
9. Finish With a Palms-Down Movement
So far, you've done movements with both supinated and neutral grips. Now, you'll wrap up your workout by using an overhand or "pronated" grip, which is ideal for targeting both the brachialis and the brachioradialis. The latter muscle provides thickness on the thumb side of the upper forearm. Curls in which the palms are down, called reverse curls, best target these two muscles.
Save reverse curls for the tail end of your workout, because once your forearm muscles are shot, you'll have trouble holding on to any piece of equipment. Because of the greater degree of slow-twitch fibers in your forearms, you might try a combination of rep targets to determine which seems to have a greater effect. There are two rep targets at the end of the workout below, so you'll end up working both the fast- and slow-twitch fibers.
If you want to further roast your forearms at the end of the workout—watch for falling shaker bottles!—just add in a couple optional sets of wrist curls or wrist-roller work.
10. Go Past Failure Some of the Time
While training past failure could be viewed as optional in big barbell lifts like squats and bench presses, it's pretty much mandatory for your biceps. But that doesn't mean you want to blow through every intensity-boosting technique on each and every set. Do that, and your workout will hit a wall pretty quickly.
Save intensity techniques for your 1-2 heaviest sets of each exercise. If you've got a workout partner, forced reps can't be beat. Once you can't complete any more clean reps on your own, your spotter can give you just enough help to get past the sticking point, but no more than that. You can perform self-assisted forced reps on single-arm exercises like Scott curls, preacher dumbbell curls, and concentration curls, using your free hand to provide the lift.

Save intensity techniques for your 1-2 heaviest sets of each exercise.
With bilateral dumbbell exercises like incline bench curls, start with both arms working simultaneously, and switch to alternating curls when you fatigue. This enables you to put a bit more body English into it when doing one arm at a time, and you get a brief rest at the bottom while the opposite side is working.
Sample Monster Biceps Routine
- Excludes warm-up sets. Do as many as you need, but never take them to muscle failure.
- Choose a load so that you reach muscle failure by the target rep.
- Train past muscle failure on the 1-2 heaviest sets of each movement.

BodyFit
$6.99/month- 2,500+ expert-created single workouts
- 3,500+ how-to exercise videos
- Detailed workout instruction
- Step-by-step workout tips
- Training at gym or at home
- Access to Workout Plans
- Access to Bodyfit App
- Store Discounts
Already have a Bodybuilding.com account with BodyFit? Sign In
What comes with BodyFit?
- Instructional Videos
Don't risk doing a workout improperly! Avoid injury and keep your form in check with in-depth instructional videos.
- How-to Images
View our enormous library of workout photos and see exactly how each exercise should be done before you give it a shot.
- Step-by-Step Instructions
Quickly read through our step-by-step directions to ensure you're doing each workout correctly the first time, every time.